
How to Crochet the Butterfly Wing Motif
- Tracy Moreland
- Jun 9, 2021
- 4 min read
Updated: Oct 13, 2022
This freeform crochet butterfly wing technique was born from a mistake. I was attempting to crochet a butterfly and didn't think it looked uniform enough. Then I realized that I would need to make two wings that looked relatively identical and said fuck that. In that moment, the @rainbowwips freeform crochet butterfly wing technique emerged. Read on...


Skill Level

In essence, this technique is very basic and easy for beginners. It uses only the single crochet (sc) and double crochet (dc) stitches. You can easily create a flat panel that works great for a bag, wall art hanging, blanket, or anything that does not require advanced shaping and fit. If you want to skip all the details about freeform crocheting a garment, you can jump to the technique here. If you're looking to make some more advanced artwear, read on my rainbow friend...
Why not just make a pattern?
This is a freeform crochet technique. If you master the technique, you can crochet whatever end item you want. I typically work in a 3-D fashion design process to create full-fashioned garments. Read about the different crochet methods and more about why we can't make patterns for freeform design in this post about Freeform Crochet.
The General Formula
This design is achieved by first creating small wing 'segments.' Then you'll join and grow the segments into larger clusters. Last, you'll join the cluster pieces together and start shaping your design. Use any hook size you like and yarn weight that is appropriate for the hook, otherwise anything goes!
Add color fleck details (optional)
Forming into crochet garments, bags, accessories and 3-d designs.
Tips
Weave in your ends and clip tails as you work. You'll be weaving in many yarn ends at the end of the project, it's inevitable. Embrace it. That is another reason this design is so special. Not many people are willing to do it because it's so time consuming. But I promise it will be worth the effort.
Keep the main piece as modular as possible so you can go back and switch things out or modify. As you work, you might decide that parts you joined previously no longer work as well, segments need to be added or maybe a couple joining stitches need to be released. It's just part of the process.
Look at pictures of real butterflies. Spend some time absorbing the visual qualities that create that "sea of butterfly" effect. Keep those pics on hand for reference and imitate life.
Keep the vision in mind and be kind to yourself. Freeform crochet takes a lot of visualization and experimentation. There are no rules. It's important to not fret over each individual stitch. Focus on the bigger shape and design.
Step 1 - Create your Colorstory

Start by picking your colors.
For a rainbow fade effect:
3 yarn colors for the wing segments
1 yarn color for the wing borders
Monarch butterfly:
Orange - wing segments
Black - wing borders
White - color fleck details
How much you need depends on what you're making. You'll want to have at least a couple skeins of each color.
This is also a great way to use up yarn scraps if you have them, for an epic rainbow butterfly.
Step 2 - Make the first segment
Here is a crochet diagram of the basic butterfly wing segment to get you going. Crochet a border around the segment.

Step 2 - Make another segment

Good job! Now make another wing segment in that color. You can use the exact pattern above, or go ahead and use some variation to see what kind of shapes you get by changing the location of increasing and decreasing your double crochet stitches.
Join these pieces together. You're going to join in your preferred fashion along the flat edges; start at the tips and end joining just before the curves so everything lays flat.
Step 3 - Make a cluster

Awesome, it's looking good! From here, you can start adding more segments to your cluster. Create a cluster at least 5" long and wide. The trick to creating the organic butterfly look is to really experiment with different size and shape wing segments.
You can also crochet new butterfly wing segments directly on the growing piece. Just start with the segments pointing in the same direction and have some fun. Really just try anything that works for you.
Crochet a nice border around each cluster. Each cluster can be thought of as a different wing, so you want them to be defined.
Step 4 - Make several clusters in different colors
Now that you've made the first cluster of wing segments, make at least 3-5 in different colorways, using the same technique as above.

Step 5 - Join the clusters
Join your clusters together from the back loops so everything lays nice and flat. You'll find spaces to add more segments. Use the border color to fill in gaps and exaggerate the wing tips by using a Double Crochet stitch when you crochet around
the rounded curves of the wing segments.
Step 6 - Edges around the entire piece
Make sure you use the border color to fill in gaps along the edges, created a scalloped hemline and exaggerate the wing tips by using a Double Crochet stitch when you crochet around the rounded curves of the wing segments. It's important to keep the curves consistent and create nice rhythm by using your designer/artistic eye.


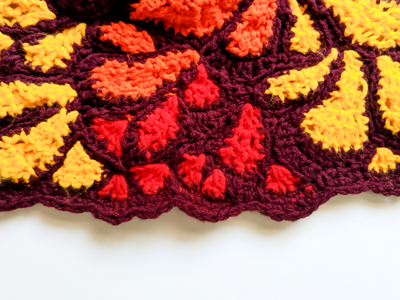
Step 7 - Add color fleck details

This is an optional step but looks really spectacular, especially on the Monarch Butterfly motif. Look at your reference photos to make it look organic, yet evenly dispersed. You can use your crochet hook to do a single surface crochet stitch, or a tapestry needle and make a nice fleck or crosshatch of some kind. I used my crochet hook with surface stitches.
Step 8 - Construct a garment.

Next step is to start creating your garment. Have a clear idea in mind of the style you're going for and sketch it out if you want to keep yourself grounded during the process. Get your dress form out and/or list of body measurements.
We made it! How did you do? Let me know what you thought of this tutorial and share your Crochet Butterfly Wing motifs on social with @rainbowwips!
Comments